I asked my dinosaur-loving 5-year-old what she wanted to be for Halloween, and NOT-to-my-surprise, she answered “Deinonychus”. No, she did not want to be a cute little Dinosaur Train dinosaur, she wanted to be a MEAN, SCARY looking dinosaur…This is my child that
announced during her pre-k graduation that when she grows up she wants to be a PALEONTOLOGIST - stunning the teachers and parents.
announced during her pre-k graduation that when she grows up she wants to be a PALEONTOLOGIST - stunning the teachers and parents.
My first thought was, “great…how the hell am I going to pull this one off!?” I have a limited budget, and of course, want her to be happy with her costume. The challenge was on. I started with a Google search for dino costumes, only to find cute and cuddly toddler dinos - nothing over size 3t. I also Googled “How to make a dinosaur costume” which gave me lot’s of helpful ideas, but the cost of gathering the materials to make some of the elaborate things could end up close to $100!! No way! I moved on to searching Craigslist. A few hits - but those in my price range, and big enough were not scary enough for her liking. Time began to run short with just over 2 weeks left to go so I needed to get cracking!
My goal was to make a dino costume as cool as possible by spending as little as possible. I had to start somewhere. Some of the “How to make...” sites used foam to shape heads for costumes, so I figured this is where I should start. I had some foam left over from an
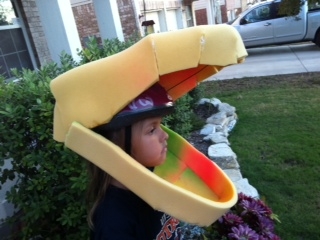
Once I had the first of the foam glued on, I kept my imagination going, forming the eye sockets and nostrils, and adding batting around the mouth to make fuller lips:

Then I used an old stretchable Jersey sheet to glue over the foam and form the skin:


I deliberated for a couple of days on how I would manage to create a body so the costume wouldn’t just look like a kid wearing a dino head, and would not require a great amount of sewing, or purchasing more fabric. After noting the shape of theropod (my 5-year old taught me the meaning of that word) dinos, I dug in the kids costume cabinet and came across some old spandex, took them in to fit her snugly, and cut and glued layers of foam over the thighs and calves to make them appear more like animal legs. I then deliberated again how to cover her body. My best bet was to dig up some old clothes and take them in where needed. I found an old t-shirt and pair of sweatpants and took them in to fit over the shapen legs:


It took a couple of fittings, and pin pricks suffered by poor munchkin, but I finally got it (nearly) right.
For paint, someone with time, patience, and a bigger budget may choose to use fabric paint. Since I didn’t really expect the costume to get much use, and because you get more paint for the $, I decided to use spray paint for the costume. It was quick, easy, and came in a larger variety of colors.
The head was completed by gluing on and painting a Styrofoam egg cut in half for each eye. I cut a jagged edge on 2 long strips of craft foam and glued them to the top and bottom of the mouth for teeth:

After the base color was applied, I finished off the costume using a polka-dot stencil I re-fabricated to achieve the scaly effect:

I completed the body of the costume by stitching up the excess sleeve and pant length to create “fingers” and “toes” stuffed with a bit of batting (one could use pieces of old paper instead), and wrapped black duct-tape into cones to serve as the claws, which I secured on with a bit of hot-glue.
And the finished product turned out better than I could have imagined!

And the finished product turned out better than I could have imagined!

I spent nearly nothing on materials, other than replacing a $2.99 bag of hot glue sticks.
Fabric: $0 (old bed sheet, t-shirt, and pants)
Foam: $0 (repurposed from previous halloween props)
Teeth: $0.25, (1/4 of a .99 cent sheet of craft foam)
Eyes: $0.50 (one styrafoam egg, out of a $3 package of 6)
Hot Glue: $2.99
Paint: $ 8.18, (used 1 and 2 halves of 3 cans of spray paint –$12.27)
Claws: $0.10 worth of Hubby’s gorilla tape
She was thrilled with the costume, was in full character whenever she had it on, and won 2 costume contests :)

She was thrilled with the costume, was in full character whenever she had it on, and won 2 costume contests :)

And we love dinosaur costume too!
ReplyDeleteI read your blog and it sounds like my life with my 7 year old daughter! Do you happen to have this costume for sale?
ReplyDeletelove this costume, randomly found it googline "make dinosaur costume"
ReplyDeleteI was wondering if you glued the bedsheet on with hot glue, or did you kind of papier mache glue it on?
Hi,
DeleteYes, I just used hot glue to glue the jersey sheet onto the foam. Thanks for your interest!
This is amazing and so inspiring! I am about to embark on making a costume and I totally relate. My three year old girl is obsessed with all things dinosaur. Before she turned three she did a show and tell on her Iguanodon fossil (which is a rock she found) and told her class all about Iguanodons (in my opinion very creepy dinos) and now we have a membership to the history museum so we can go every week to look at all the fossils and watch the paleontologists work. Where it came from I dont know, but I love it!
ReplyDeleteThank you for sharing your incredible costume.
I'm so glad my sharing can help with some inspiration for you own endeavor! Best of luck to you.
DeleteI love the costumes.... I'll have to create my daughters favorite dinosaur for her school presentation!!!
ReplyDeleteHello great costume! Im trying to figureout how, u made the . Claws n feet
ReplyDeleteAnd the tail!
DeleteHi, the sleeves and stretchy pant legs were quite long (they were oversized- shirt to allow room for chest pad, and I took pant waist in to fit her) so I just sewed 2 lines to separate into fingers/toes and stuffed with cotton filler, and attached black electrical tape to the ends for claws. the tail was a large scrap of bed sheet fabric sewn into a cone shape, attached to pants and stuffed. HTH!!
DeleteHow did she do walking around? Could she see? I think this is a brilliant idea. My 4 year old is incredibly clumsy. I'm afraid he'll find a way to trip and fall. Any suggestions?
ReplyDeleteHi Abby, she could walk around fine and could see perfectly. The extra padding might actually be a benefit if he's clumsy. Ha ha. The only problem she had was that she got really hot and had to take the head off for a bit 😊
DeleteHow did you do the tail? And how is it attached to the pants?
ReplyDeleteHi Lisa! I cut a big triangular piece of fabric from the scraps I had, and sewed 2 sided together, then stuffed part way and sewed onto the body piece leaving a open gap to finish stuffing then hand stitched it It's a bit tricky with the big bulky piece, you can pin and see prior to stuffing
ReplyDeleteThis comment has been removed by a blog administrator.
ReplyDeleteI'm having such a hard time with the head :( I put the fabric on and it's weighing it down! Any suggestions?
ReplyDeleteHi! a used a disassembled wire hanger shaped around the underside of the top and connected to helmet to hold it up! You can kinda see it in the first pic. Hope that helps. Good luck!!
ReplyDeleteThanks for the reply! Another question, how did you form the foam for the chest? Did you wrap it around the shoulders or did you use it just as like a shield? Thanks SO much for your help. This is the best costume I've found so far!!!
ReplyDeleteFor for the chest, thighs, and calves I cut pieces of foam into circles and layered a smaller oval tier on top to form the shapes. Chest had I think 3 tiers. I just helped her shove them into the stretchy clothing.
DeleteYou are very welcome. Thanks so much for the kind words! I'd love to see how yours turns out if you wouldn't mind sharing a pic link when done :-)
I replied, but I'm not seeing my comment.
DeleteThanks for the tips! I'll definitely send over a pic when I'm finished :)
We're making a "Spinosaurus" so we've still gotta add the sail, finish the head, and paint and we'll be done! :)
Hello- me again. What spray paint did you use? I used flat Vaspar, but it's not looking smooth like yours :( any tips on the pattern? I can send you a pic of my head if you don't mind helping ;)
ReplyDeleteI just used cheap spray paint from Home Depot (probably the same brand) Now that I think of it, Probably would be advised to stay away from candles 8-[ The actual texture on the fabric was a bit rough. As far as a pattern I didn't use one...I just winged it by taking in old clothes I had on hand. Feel free to Send a pic to fawn.morgan@gmail.com if you like :-)
DeleteHi, this is amazing! Thank you for sharing...I didn't know if I would be able to pull off the costume my son wanted this year but now I have hope! What kind of foam did you use to create the head?
ReplyDeleteHi Jenny, the foam was just scraps of some 1/2" thick foam you can get at a fabric store or Hobby Lobby.
Delete