Saturday, September 6, 2014
https://www.facebook.com/occasioncreationssa
I love being creative and using it to help my friends and neighbors. I've been a stay-at-home mom for over 2 years now, and the whole non-working thing is still something I'm getting used to. I feel busier now than I did with a job - Except I'm not getting paid! So maybe I can earn a little "allowance" by doing something I enjoy. Here goes nothin!...
Monday, October 22, 2012
My 2012 Halloween Costume Challenge
Okay, I know in my last post I mentioned how glad I was to get out of making the kiddo's costume this year, but....
Since for the munchkin we purchased a "How to Train Your Dragon" costume of the Gronckle dragon, hubby and I decided to go along with her theme and dress up as Vikings. We have been invited to a Halloween party next Saturday, so I have 5 days to create our 2 costumes and find or make accessories. I would LOVE to have my end total for BOTH to come out equal or less than what ONE ready-made costume from the store would cost.
Monday:
Hubby and I set off today for thrift shop finds to use in creating the costumes. Searching through 3 stores scored us a brown fleece blanket for $2, some laughs at interesting and some disturbing items for sale, and overall a fun cheap day-date. We stopped into Hobby Lobby and purchased 1 1/3 yards of faux fur, and 1/3 yard of faux leather for $16.


Tuesday:
Didn't make much progress today. I had hubby stop and pick up the sheet set and proceeded with measuring and cutting his tunic:

Wednesday:
Got a few things done. I sewed the edges of the tunic, and got my skirt started. I used more of the piece of the sheet and measured around the largest part of my lower 1/2. I will use the existing large hem of the sheet for my waistband. I'll insert elastic into the waistband because I have not yet made friends with zippers and hooks when it comes to clothesmaking. I cut and sewed the vertical hem and chopped the bottom:


I'm out of elastic so need to run to the store tomorrow,
but I was able to grab up a bottle of brown dye for a white
tank top I already have. It came to less than $3, and I only
used a teaspoon full.
I plan to trim it with some of the fur I found in my craft closet:
I also got our belts started. The faux leather fabric was wide enough that 1 foot will make a belt for each of us:

Current total spent: Appx $21 (with extra dye left over) and a house being neglected of good cleaning.
Thursday:
The thing I like about costume making is I don't have to follow a plan. I never know what my end product is going to look like until I decide it is done. Wow! I feel like such an artist :)
I was a busy bee today and even had some time to attend to a much needed vacuuming after fur trimmings have led to my carpets looking like I hosted an adopt-a-pet function. I first set to trimming my top:

I thought this looks pretty plain by itself and decided it would look great with a cape. I thought an all-fur one would be too much going on, so I put the fleece blanket to use. What I love about using this is that 4 edges were already pre-sewn so all I had to do was attach a strip of fur to the bottom and a button.


I used the hot glue to add some decorative design to these items, spray painted, and, voila! I have a medallion belt buckle, and a goblet:

It was a proud moment when I showed them to hubby and he asked me where I purchased them.
Finally I moved on to my head-dress. Hubby was able to borrow a viking hat that, for some reason, resides in his office. I thought my dino-divas' replica of a T-Rex tooth fossil would make a perfect mold. I covered it with a paper towel and wraped duct tape around it, and stuffed paper towel inside to hold shape. Masking tape would have been great too, if I had it.


I proceeded to papier mache' over my 2 molds using the strong durable paper towels I have since I had no newspaper on hand. I speed dried it by placing my oven on the lowest setting and leaving the oven door cracked. I painted over with white acrylic paint and it was dry after dinner. I measured a 2 inch wide strip of fur to wrap within 1-2 inches of my head circumference, and used a piece of elastic to complete the length and connect the headwrap so it would fit snuggly. I cut a hole a bit smaller than bottom of the "horns" and placed them through each hole till the fabric was taught, securing them underneath with hot glue.


Whew!! I'm almost done!!
Current total spent: Appx $27 (with extra bronze spray paint left over)
Friday:
I'm done! And I finished before noon - On top of an early morning grocery trip! My finishing touches were the man viking kilt made from the fleece blanket, with the waistband from a strip of the brown bedsheet:

As well as boot covers to make our existing boots more viking-like.


I think all we need now are to accessorize with a couple of weapons we can purchase at the costume store, and a gorgeous manly viking beard :)
Here we are at the Halloween party all decked out in our How To Train Your Dragon themed costumes!


Total spent for BOTH Viking costumes including beard and dagger: $38
Gronckle dragon costume purchased on ebay: $12
...That's 3 costumes at the price it would have been to purchase ONE lady viking costume. SCORE!
Thursday, October 18, 2012
The Dino Delerium Continues
It's almost Halloween again and I am happy to say I'm getting away with a simple costume purchase off of EBay this year. I was (this) close to having to create a winged Dino costume. Instead we found a nice deal on a "How to Train Your Dragon" costume.
My current struggle is how to get her interested in browsing for books that have to do with anything other than dinosaurs. I am finding her Dino enthusiasm a little extreme. She will consider books about animals after a bit of coaxing, but really...ugh!
I can say I am proud of her current interest in creating her OWN books about dinosaurs. She is becoming quite the author/illustrator :)
In the mean time, I plan to put together a new post about some fun Dino related attractions we have visited in the last year.
Monday, April 30, 2012
How We Threw a Dino-Mite Birthday Bash
In my last post I mentioned I wanted to share my little monsters birthday bash, so here we go!
My dino-crazy kiddo of course just HAD to have a dinosaur
themed birthday party. I knew she
probably would not get any more use out of her awesome costume, so we took the
opportunity to get one last day of fun with it. She helped me create these super cute invitations we printed
using card stock and scrap-book paper.

She hand – er – claw-delivered them to her list of invitees 2 weeks before the big event.

I was able to involve her in many of the projects in
preparation for the party.
1)
Dino-egg piñata – this was a cheap and easy project
where we simply used a balloon to create the paper mâché piñata


2)
I used a project board to make a fun dino-scene to take
pics of the kids to be delivered with Thank-You cards. If you do not have drawing skills you
can find a similar item on orientaltrading.com where I purchased blow-up dinos,
dino grabbers, decorations, stickers, and charms.

3)
I put hubby to work creating a fun volcano centerpiece
out of cardboard and paper mâché, and was used to entertain the kids while
setting up the other games.

4) To welcome our guests, I created this fun dino-xing sign and my daughter put her own art skills to use drawing footprints up the driveway.


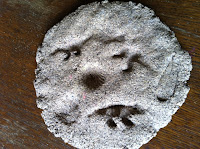
5) As the guests arrived they made their own dino fossils, until everyone was ready for games.
6) Pin-the-horn on Triceratops was simply drawn and created with colored poster board. Other games included a dino-dig, and a cheese ball relay where 2 teams used their dino-grabbers to move cheese balls from a large bowl to a cup.

6) Pin-the-horn on Triceratops was simply drawn and created with colored poster board. Other games included a dino-dig, and a cheese ball relay where 2 teams used their dino-grabbers to move cheese balls from a large bowl to a cup.


7)
Gift bags were made using brown lunch sacks, card stock
and scrap-book paper that matched the invitations. The dino patterns were made
from free coloring pages found on the internet where we also found fun
pteranadon cup-mate patterns.

8)
Goodies included chocolate dino pops (made with candy
molds found at the craft store) dino-bone breadsticks, dino-sandwiches (cut
with a dino sandwich cutter found in the grocery store), dino chicken nuggets,
and a dino-head melon.
According to my kiddo, it was the “best birthday party ever”
which made all the prep-work worth while.
I need to go back and find the links to give credit where I found inspiration/instructions for some of these ideas, but in the mean time if you have any questions on where to find/how to create any of these party items, just send me a comment! :)
Sunday, April 15, 2012
Homemade dinosaur costume
I asked my dinosaur-loving 5-year-old what she wanted to be for Halloween, and NOT-to-my-surprise, she answered “Deinonychus”. No, she did not want to be a cute little Dinosaur Train dinosaur, she wanted to be a MEAN, SCARY looking dinosaur…This is my child that
announced during her pre-k graduation that when she grows up she wants to be a PALEONTOLOGIST - stunning the teachers and parents.
announced during her pre-k graduation that when she grows up she wants to be a PALEONTOLOGIST - stunning the teachers and parents.
My first thought was, “great…how the hell am I going to pull this one off!?” I have a limited budget, and of course, want her to be happy with her costume. The challenge was on. I started with a Google search for dino costumes, only to find cute and cuddly toddler dinos - nothing over size 3t. I also Googled “How to make a dinosaur costume” which gave me lot’s of helpful ideas, but the cost of gathering the materials to make some of the elaborate things could end up close to $100!! No way! I moved on to searching Craigslist. A few hits - but those in my price range, and big enough were not scary enough for her liking. Time began to run short with just over 2 weeks left to go so I needed to get cracking!
My goal was to make a dino costume as cool as possible by spending as little as possible. I had to start somewhere. Some of the “How to make...” sites used foam to shape heads for costumes, so I figured this is where I should start. I had some foam left over from an
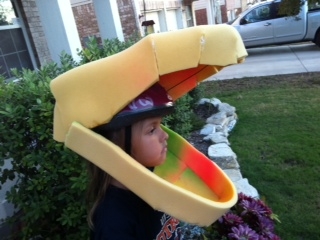
Once I had the first of the foam glued on, I kept my imagination going, forming the eye sockets and nostrils, and adding batting around the mouth to make fuller lips:

Then I used an old stretchable Jersey sheet to glue over the foam and form the skin:


I deliberated for a couple of days on how I would manage to create a body so the costume wouldn’t just look like a kid wearing a dino head, and would not require a great amount of sewing, or purchasing more fabric. After noting the shape of theropod (my 5-year old taught me the meaning of that word) dinos, I dug in the kids costume cabinet and came across some old spandex, took them in to fit her snugly, and cut and glued layers of foam over the thighs and calves to make them appear more like animal legs. I then deliberated again how to cover her body. My best bet was to dig up some old clothes and take them in where needed. I found an old t-shirt and pair of sweatpants and took them in to fit over the shapen legs:


It took a couple of fittings, and pin pricks suffered by poor munchkin, but I finally got it (nearly) right.
For paint, someone with time, patience, and a bigger budget may choose to use fabric paint. Since I didn’t really expect the costume to get much use, and because you get more paint for the $, I decided to use spray paint for the costume. It was quick, easy, and came in a larger variety of colors.
The head was completed by gluing on and painting a Styrofoam egg cut in half for each eye. I cut a jagged edge on 2 long strips of craft foam and glued them to the top and bottom of the mouth for teeth:

After the base color was applied, I finished off the costume using a polka-dot stencil I re-fabricated to achieve the scaly effect:

I completed the body of the costume by stitching up the excess sleeve and pant length to create “fingers” and “toes” stuffed with a bit of batting (one could use pieces of old paper instead), and wrapped black duct-tape into cones to serve as the claws, which I secured on with a bit of hot-glue.
And the finished product turned out better than I could have imagined!

And the finished product turned out better than I could have imagined!

I spent nearly nothing on materials, other than replacing a $2.99 bag of hot glue sticks.
Fabric: $0 (old bed sheet, t-shirt, and pants)
Foam: $0 (repurposed from previous halloween props)
Teeth: $0.25, (1/4 of a .99 cent sheet of craft foam)
Eyes: $0.50 (one styrafoam egg, out of a $3 package of 6)
Hot Glue: $2.99
Paint: $ 8.18, (used 1 and 2 halves of 3 cans of spray paint –$12.27)
Claws: $0.10 worth of Hubby’s gorilla tape
She was thrilled with the costume, was in full character whenever she had it on, and won 2 costume contests :)

She was thrilled with the costume, was in full character whenever she had it on, and won 2 costume contests :)

Thursday, April 12, 2012
Drowning in Dinos
I completely and utterly feel like I am the only mother (of a girl) who is drowning in dinosaurs!
My brain is drowning in overload of dinosaur facts! I know more about dinosaurs than I ever cared to know!
For instance: the longest dinosaur name "Micropachycephallosaurus" belongs to one of the smallest dinosaurs ever discovered, or that the raptor portrayed in the movie Jurassic Park would not have been velociraptor because it was actually only the size of a turkey, so the ferocious meat-eating dino in the movie would have more appropriately been deinonychus.... see what I mean! drowning.....
Not only is my brain drowning, my home is drowning in dinosaur toys. Plastic figurines, puzzles, helmet, water can, movies, stuffed dinos...my iphone has dinosaur apps for crying out loud! drowning....
Her wardrobe includes dino pajamas, dino sneakers, dino t-shirts, and if dinos came on skirts or dresses, she'd probably have those too (which is actually a project I may set out to accomplish). drowning...
Her birthday was a dinosaur theme, her room is decked out in dino decor. Both of which I'd love to share very soon. drowning...
She wishes she could have a pet dinosaur. She draws dinosaurs daily, and I don't think anyone has received a hand-made card from her that does NOT include a dinosaur drawn on it - even for Christmas, Valentines day and Easter (with bunny ears of course)! drowning...
She can recite the name of a dinosaur for all but 5 letters of the alphabet. You can't speak the word "dino" without her perking up and getting excited to know what you're talking about. She's crazy....
....and I love it.
Her dino craze began over and a holf ago, so I continue to wonder if this is a phase, or if she is a future Ross Gellar a-la "Friends". It would be interesting to find someone out there with a little girl (or even boy) that loves dinosaurs as much as mine does.
Subscribe to:
Posts (Atom)